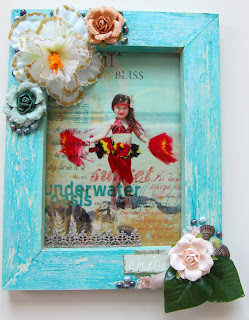
I've been still busy running around with all sorts of end of year activities and trying to figure out what I'll do for Riley's birthday party. If I would have realized it were June yesterday, I probably would have posted this adorable framed piece I made for The Sampler this month. I guess I haven't officially said but I am on the design team now. Here is the first project I had made.
Michael stretches canvas for me and this frame was one that was turned the wrong way for a profile piece. But I kept it anyhow. It was just plain, unfinished wood and I coated it with Golden Titan Buff acrylic paint. It's an off-white color. I had Delta's crackle medium but I never can get a crackle. Maybe it's because I'm impatient. But I continued to try to get a crackle. I used my heat gun to dry between layers. Yes even partially through the crackle medium. Probably why it will never crackle. I recently read that you can use Elmer's to get your paint to crackle too.
I added another layer of Titan Buff then another layer of crackle medium. I sometimes would leave the heat directed onto one spot and the paint would bubble. Once dried, I took a paper towel and used my nails on the other side to scrape some of the paint off. Where the bubbles were created a nice uneven texture in the wood. The parts I scraped off would create grooves. Next, I grabbed Golden's Interference Blue which is a white pearl like paint with blue metallic mica. I painted that on and the crackle medium again. The final layer was Golden's Turquois (Phthalo) which was a perfect match for the Webster's Paper that comes in the kit. I heated all that and again let the bubbles happen. I scraped a few more spots of paint off and it looked like a real antiqued piece just in a happy color.
There doesn't look like there was much done to the Webster's Pages Seaside Retreat diecut paper; however, I did coat it with Pearl Glimmer Mist. Up in the top, left corner is a lighter circular pattern that resembles a compass. I placed the largest Tim Holtz Time Works mask in the kit within the compass. Then I sprayed it with Glimmer Mist Seafoam. The paper looks a bit yellow in the image above, but it's actually a nice blue match for Seafoam. You can see where I sprayed it above in the photo that goes around Riley's face.
I loved the paper so much that I didn't want to cover it up so I printed the photo on a transparency, which also gave it a look like there is glass in the frame. I grabbed a hibiscus flower I had purchased at dollar tree and added vintage glass glitter to the edges. Then added the Prima roses to the frame. I had some pearl beads in my stash so I used those around the flowers.
This really needed some seashells, so I cut the remainder of shells from the diecut paper then I bent and curved the edges to give it a real shell look. And the trim was left over from last month's Sampler kit. Now you may not have a Tahitian costume or the ocean near you but you sure can get the beach look by printing your photo onto a transparency and using up the natural goodness of the paper.


2 comments:
Beautiful creation! I'm loving the June Sampler kit, so much fun!
Hugs
Amber
this is so pretty!
Post a Comment